OpenCart 2.3: How To Set Up Multi-Store

Most of the popular eCommerce frameworks available in the market provide the ability to offer multiple stores from within a single installation, and OpenCart is no different. In this tutorial, you’re going to learn how to create a multi-store setup using a single installation of OpenCart.
Throughout the tutorial, we’ll walk through the back-end section to explore what exactly a multi-store setup is and how it can benefit us in the use case of setting up multiple websites.
What Is Multi-Store?
First, let’s understand what multi-store is all about. Suppose you’ve set up a nice-looking online store selling products using OpenCart. And you’re happy with it as it’s rolling on and you’re making sales.
Now, however, you’re planning to set up a variety of products, but you realize that it would be too much to include everything in the same store.
So you’ve come up with a solution to set up different subdomains for each major category. For example, “<electronics.mysite” sells all the products related to electronics in the same way that “<books.mysite” represents your online book store. This kind of setup is certainly beneficial in that you can have a different look and feel for each subdomain according to the type of product it represents.
For the moment, assume that you’re not familiar with the multi-store setup of OpenCart. Generally speaking, you would copy and duplicate the OpenCart installation for every subdomain and do the same for the database as well. So as you can see, every time you want to set up a new subdomain store, you need to duplicate the code and database.
Although it may sound easy at first, you’ll soon realize that it’s really difficult to manage all the subdomain sites. Also during the OpenCart version upgrade process, you need to do the same for every subdomain. On top of that, if you’re using a lot of third-party extensions, you need to manage that for each and every store.
The multi-store feature comes to the rescue. This feature allows you to set up multiple stores using a single installation of OpenCart. Yes: You can set up as many stores you would like, using just a single installation.
Set Up the New Subdomain
Before we move ahead to set up the new store in the OpenCart back-end, you’ll need to make sure you’ve already set up the new subdomain or domain pointing to the same default OpenCart installation. You can do that using the control panel of your hosting provider. We won’t go into the details of creating a new subdomain, as this is something outside the scope of this tutorial.
For the rest of the tutorial, we’ll consider “myexamplestore” as our main default OpenCart installation and “store1.myexamplestore” as our new store. So I assume that “store1.myexamplestore” is also pointing to the same document root as that of the “myexamplestore“.
Create a New Store From the Back-End
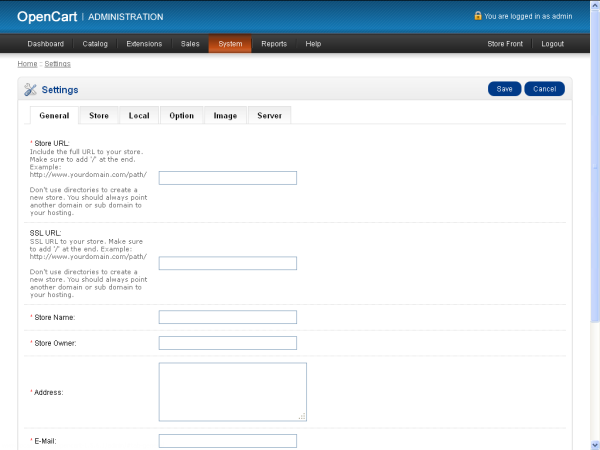
Head over to the back-end of OpenCart. Go to System > Settings and it will list all the stores available in OpenCart. In most cases, it’ll be a just a single entry for your default and the only store. Click on the Insert button to create a new store.

In the new store creation interface, there are different tabs available. Lets check each tab in detail.
General
The most important setting in this tab is Store URL. This should be set to the new subdomain/domain of your store. The other setting, SSL URL, is useful if you want to provide secure checkout in the front-end and also want to secure your back-end dashboard.
The rest of the settings like Store Name, Store Owner, etc., are self-explanatory.
Store
Other important settings in this tab are Template and Default Layout. You can specify a different theme for your new store using the Template setting. And you can set up the default layout of the cart using the Default Layout setting.
Local
Under this tab, you can find settings related to localization. You can set the country, state and language for your store. Another important setting is Currency, which is used to set the specific currency a user would be prompted with during checkout in this store.
Option
This tab allows you to set front-end-related parameters.
Image
Under this tab, you can upload a Store Logo and Icon. Also you can set the dimensions for the different versions of the images used in the front-end.
Server
The toggle setting for the SSL is available under this tab if you want to enable this for the checkout and admin dashboards.
So once you’ve filled in all the necessary details, click on the Save button to create the new store.
Management of the Multi-Store
So we’ve just created a new store in the OpenCart back-end. Let’s see what you can do with your new store. In most cases, the reason for creating a new store is to set up a different set of categories and products. The settings OpenCart allows you to set up for your store are:
- Products
- Categories
- Manufacturers
- Page Layouts
- Front-end Theme
- Information (Static Pages)
For example, let’s see how you can set up store-specific categories and products.
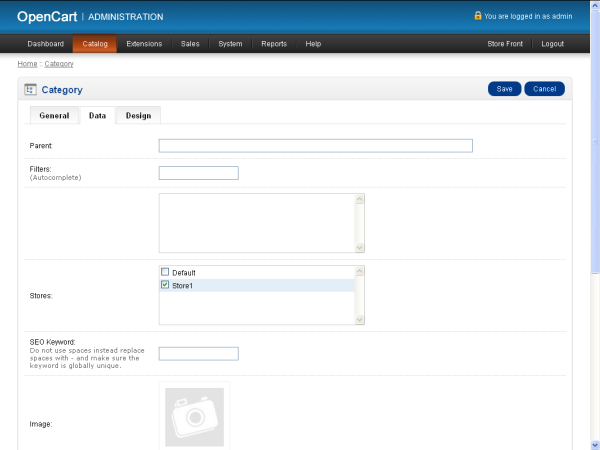
Go to the back-end and access Catalog > Categories to bring the list of categories. Click on Insert to create a new category.

Under the Data tab, there is a field Stores showing all the available stores in your OpenCart installation. So the category will only be displayed under the stores which are checked here. In the screenshot, you can see that only Store1 is selected, which means that this category won’t be displayed in the Default store.
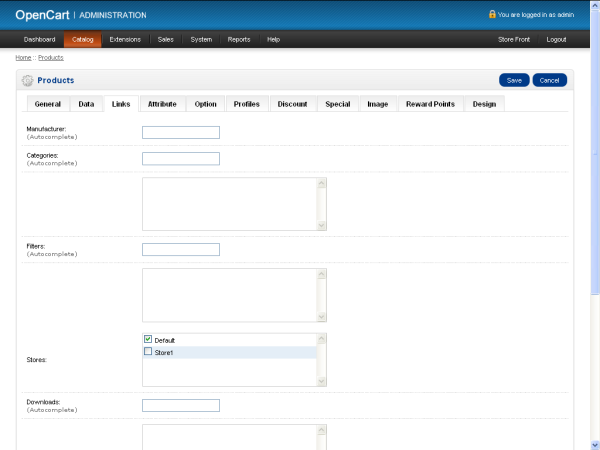
Now let’s see the corresponding setting in the case of products. Go to Catalog > Products to bring up the list of products. Click on Insert to create a new product.

Under the Links tab, there is a field labeled Stores that shows all of the available stores in your OpenCart installation. So as explained earlier, in the case of category, you can select the stores here under which you would like the product to be listed.
So in this way, you can set up a whole bunch of categories and products for your store. The same procedure applies to the other entities like “Information”, “Manufacturers”, etc.
Apart from this, you can manage all the stores using a single admin interface. In our case, we can log in to the back-end through either “myexamplestore” or “store1.myexamplestore“. So if you’ve set up a couple of stores, it’s really easy to manage all the stores through the central admin interface.
Front-End Aspects
As I mentioned earlier, you could assign a different theme for your store. So it’ll help you to design the look and feel of each store completely differently from each other, as they are totally different sites.
The orders and customer accounts created from the front-end are associated with the corresponding store from which they were created. It’ll help you to analyze the sales reporting for each store.
So overall, that’s almost every feature OpenCart provides to help you migrate your different web shops to a single multi-store-based OpenCart site.
Summary
Hopefully, you’ve enjoyed the post and learned something new as far as OpenCart is concerned. I encourage you to go ahead and give it a try, which is the best way to understand how it works.